it's true. fly the flags, hang the banners. i've finished converting the grimy green vintage suitcase into a sleek entrance table. after months of tweeting about it, i say it's about time!

i found this suitcase on the side streets of my neighbourhood, all lonely and dejected, just sitting in the misty rain, awaiting someone with vision who could see all it's potential. i couldn't help but almost (almost) say out loud 'come in off the street old friend, i have an amazing idea and a home for you.' so in she came and the ideas began. given the large size and awesome shape i didn't want to just make a dog bed out of it (the next thing on my list), i wanted to see if i could make a cute table. as i got brainstorming and googling away, i was flooded with a whole host of colourful combinations and options. there were so many options that i soon found myself considering wacky combinations, none of which i would really like to have in my own home. after much deliberation and procrastinating i realized that while i love colour, i wanted classic, sleek and vintage for this piece. so i went with that.

after giving it a thorough cleaning, with trusty rust-oleum spray primer in hand, off i went, and 2 coats later i was ready to start painting. i chose a glossy black. i had taped off the hardware and the handle, thinking i was going to paint them a contrasting colour, but in the end, went with all black. i considered adhering fabric to the top as well, but decided to go back to basic black, knowing i can alter later. i think i did 3 or 4 coats of black, simply because there was stitching to do, various sides, and details that need to be filled in by multiple coats. so shiny! so smooth! easy peasie!

next, legs. home depot seemed to have some basic varieties, so i grabbed 4 legs, 4 angled brackets, and that was all i needed. once i checked out how some of the other angled-legged furniture was constructed around here i mapped out the base where i would attach the brackets. done and done.

the legs i chose are long, making her look a little like Bambi through the leg, so hence the name. i wanted a high table for my entrance way, so i decided the longer the better. i'm also a big fan of function and storage, so i started to check around and found a perfect piece of pine to use for a shelf.
knowing nothing, i decided to turn the table over , approximate where the shelf would sit, and figured how much of each corner of the shelf i would need to remove so it could sit on pegs, all comfy and snug like. i winged it, basically. I measured equal distances where the shelf would sit, and screwed in small screws on the inside of each leg, forming a peg ledge the shelf would fit on.
next, i took a jigsaw to remove the corners so they fit around the round curve of the leg. i then drilled a hole on the edge of each corner, making sure to break through the bottom of the shelf, making a perfect slot to slide over the nail on each leg. you get it, right? i should have taken photos of THAT! lol. a process, if i do say so myself. i then sanded the edges and primed and painted the shelf. then fit it in place by loosening legs, and tightening them once the shelf is in place.
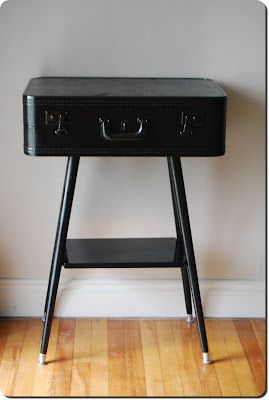
so now, she sits in the entrance way. i threw this together for the picture, but think the mirror needs to be lowered etc., but for now, i love it. we've needed something like this inside our front door for a long time. yay! oh bambi. how i do love you.


so that's my vintage suitcase table b&a! i think there are more in my future. with stripes. stay tuned. so fun!
♥ leel ♥
10 comments:
Oh my god. This is fantastic. I am totally going to use an old suitcase from my granny and do the same thing. Thanks for the inspiration!
Jaysus Woman, you should have your own TV show.. I love it
That is too awesome. I mean it, my head might explode. So cool!!! I want.
Wow it is very funky! GOOD JOB!!
hmmm LOL i was just thinking this would be a great wedding gift...giggle....hey stell look what leely gave us LOL!! im joking, you can keep it, we are happy to wait for the next one LOLOL!
Seriously, this has turned out very awesome.
xxsm
Oh my! LOVE it! I even like it in green! But, it looks more like a robin's egg blue on my screen. If you say it's grimy green, I may need to do some adjusting of the ole' settings. Well done!
This totally rocks. I love it. Me too, I want one. Now if only I had a vintage suitcase laying around...
oh, my gosh! I love trunks and suitcases and i am so impressed with what you have done with this! That shade of blue came across my screen as nearly a jewel-tone that I quite liked. Your end results ae SOOOO impressive - artistic and finished. Felt pads on the bottom and I would have called it a coffee table. I woud love to look at the world through your glasses for a few hours.
ok, I have one of those small travel cases, you know with the mirror on the inside lid. i totally, want it on legs with a litte shelf under it, but I want it to still open (yes, our puppy still thinks she should eat toilet paper. perhaps she is a paper mache artist and i just don't know it yet!). it would be perfect in our bathroom!
Hi...I am your newest follower, and a fellow Canadian :-)
I absolutely love, love, love what you did with this suitcase!! I am working on a vintage suitcase as we speak!
Feel free to drop by my blog sometime!
Loved this project and can't wait to make my own suitcase table. I've been thinking of a chair for quite sometime as well. Thanks for sharing! Also- I just wanted to let you know I've included a link to this in a project round up over at http://craftanddestroy.blogspot.com/2013/03/project-round-up.html
Cheers!
Post a Comment